With the rising numbers of COVID-19 cases during the first wave of the pandemic in 2020, I was working remotely a lot. At home I have some decent audio gear (beyderdynamic DT 297 PV MK II, Shure SM7B, beyderdynamic DT 770 PRO, and Yamaha HS 5) connected to my Mac via USB audio interfaces (Focusrite Scarlett 2i2 and MOTU M2).
As I wanted to use the same audio devices for my corporate video conferences I needed a convenient way to connect them to my corporate computer as well. My first idea was to use an USB switch like the ATEN US234, but this had two downsides: First I wasn't able to use them on both PCs at the same time, e.g. hearing music from my private Mac while having a conference call with the corporate PC. Secondly switching the audio interfaces always results in a very loud clicking noise which was really annoying, especially when having the monitor speakers switched on.
So I researched for a more elaborate solution. There are many USB enabled audio mixers, but I couldn't find a single one fulfilling my needs, which were
- multiple (at least 2) USB interfaces,
- multiple (at least 2) microphone inputs,
- multiple (at least 2) head phones outputs,
- monitor output,
- and routing of audio from one USB interface to the other USB interfaces.
I recalled some nice streams (iCE40 : Implementing a USB sound card on iCEbreaker-bitsy, FPGA / iCE40 : Implementing a USB sound card on iCEbreaker-bitsy) by Sylvain Munaut which I saw when I first started playing with the iCEBreaker boards. His implementation still does a lot in software using a soft-core in the FPGA, but while researching about how USB audio (and USB in general works) I stumbled upon the LUNA project. LUNA is a USB multitool & Amaranth HDL library, which implements full USB2 in FPGA gate-ware. This sounded very interesting.
W-Output HP
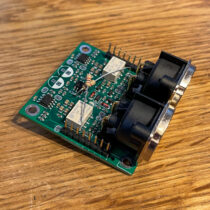
Whereas LUNA would be able to provide digital audio samples from the PC on the FPGA I still needed a way to generate and sample analog signals. This is usually done using off-the-shelf DACs and ADCs. Tomi Nihtilä does a lot of very awesome DIY audio projects on his webpage and sells ready-to-use DAC and ADC modules which support I2S, the de facto standard for transmitting digital audio signals between ICs. So I contacted him and bought some of his pre-tested boards for handling the analog stuff. I got two ADC AK5572 to be able to support four input mono channels and three W-DAC S 4493 to support three stereo output channels. For one of the output channels I got a W-Output XLR Mute to be able to drive my monitor speakers. Tomi also developed a nice head phone amplifier board, the HP Buf. Unfortunately this doesn't interface directly with his W-DAC boards, but as he provides schematics for all his designs, I was able to adapt it.
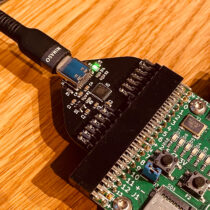
Pmod™ Compatible USB ULPI PHY
For my first steps with LUNA I build a Pmod™ Compatible USB ULPI PHY for my ULX3S evaluation board and was able to run basic USB communication very soon. To have a more robust testing setup I build a more complex test boards based on the Colorlight i9 card, which basically a ECP5 FPGA with flash, external RAM and power logic. There is some reverse-engineering documentation on GitHub by wuxx and on Twitter by Claude Schwarz. It can be found in the Mixer-FPGA repository. I build a lot of PoCs on this Mixer-FPGA boards to demonstrate
- audio output from PC to DAC,
- audio input from DAC to PC,
- showing audio levels on VU meter,
- and manipulating audio, e.g. volume.
Prototyping on ULX3S
Prototyping on ULX3S
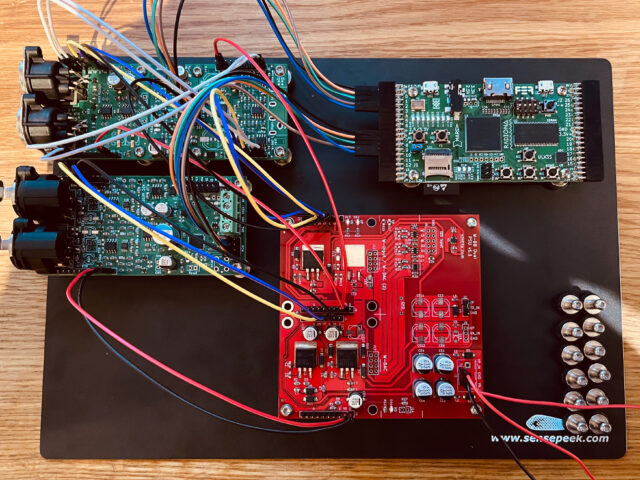
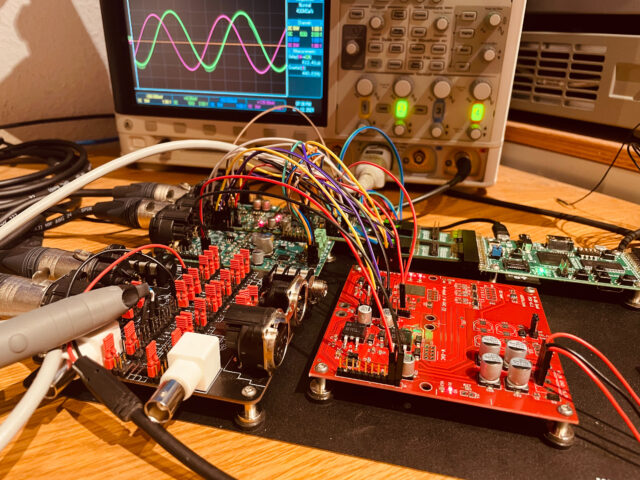
Prototyping with Colorlight i9

Prototyping with Colorlight i9
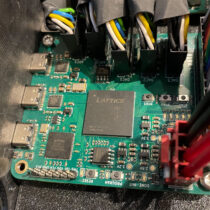
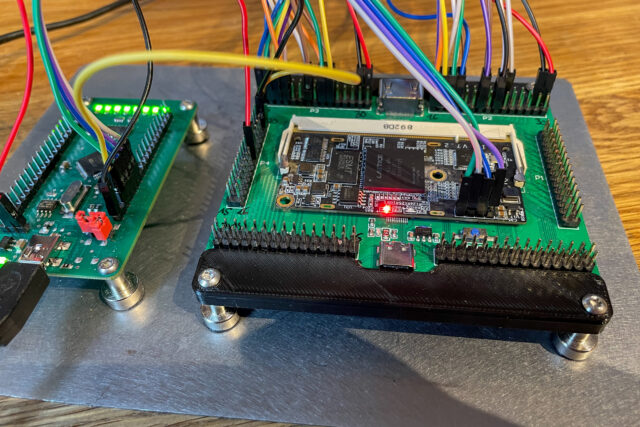
Mainboard
After completing all of these I finally started designing the final hardware for the mixer. It consists of several repositories:
- The Mainboard with
- two USB PHYs for USB audio connections to towards a PC,
- a USB debug port using an FT2232 for programming the FPGA,
- and several pin headers for connections towards DAC, ADCs and the front panel.
- The Frontpanel for setting volume of all input/output channels.
- The W-Output compatible head phones amplifiers.
- The Klinke Dual adapter boards to be able to also use head phones with phone jacks.
- The W-DAC piggy board to connect the W-DAC with the W-Output boards in a side-to-side orientation instead of a stack-up to save height.
- The Power-Supply which takes power from a RPT-75 power supply and stabilises the supply voltages for the op-amps and monitors all to voltage rails. It is based on Tomi's Smart PSU 3.
- The case.
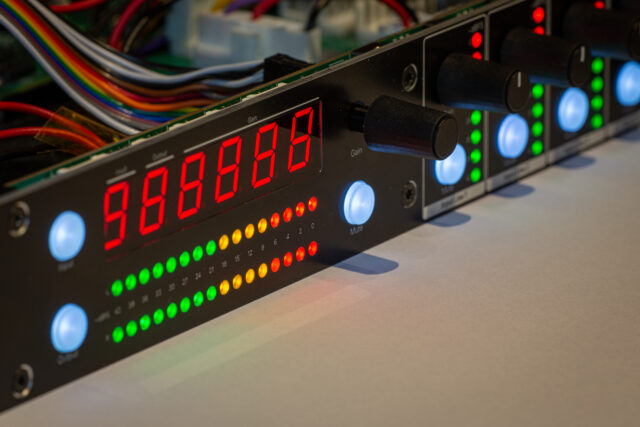
Frontpanel

Frontpanel
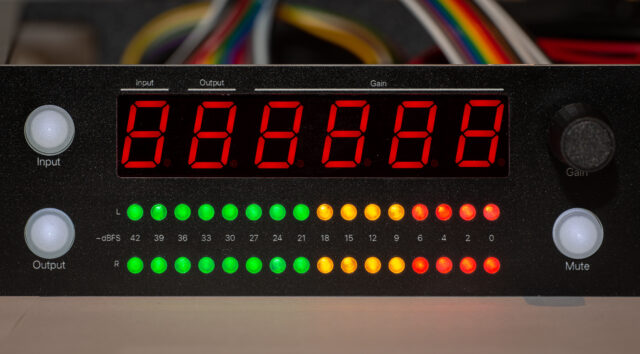
Frontpanel
The software for the power-supply board and the gate-ware for the FPGA is still work-in-progress in will be described in a follow-up post.
Hi Tobias
I saw your transformer mod for the dbx 286s and was wondering if you could provide more information.
1,Where do I find the pcb
2,what was the black plate
3, what are specs for fuse
4,do you happen to have a detailed assembly guide or video
Thankyou
1. You can find the PCB and other parts at https://github.com/twam/Transformer-DBX286s.
2. The black plate is an adapter to mount it. This is 3D printed. File can be found at https://github.com/twam/Transformer-DBX286s/tree/master/Mount
3. IIRC it was ~500 mA. The lowest value I had lying around. 🙂
4. No, but assembly is straight forward 🙂
Hi Tobias,
Over Covid lockdowns in Melbourne Australia, I had a desire to build a project to solve a very similar problem, and didn't quite have the technical knowledge to follow through on it. I'm so excited to have found somebody else with the same goal, who has managed to pull it off! This is great!
I'm very keen to see the next part of this
Hi Tobias,
Ich finde dein Projekt sehr spannend und wollte fragen wie es weiter ging?
Mfg
Nico
Hi Nico. Der Mixer funktioniert einwandfrei und ist im täglichen Einsatz!